Other Engine How To's
You must use an impact wrench. Use a gloved hand or put a rag over the pulley and hold
the pulley and hit the nut with the impact gun, it will spin right off. You will need to use
the impact to install it too. Most service stations will do this for free but
you can use this as an excuse to buy an air compressor and an impact wrench.
Rob Robinette
Jack up the left front of the car, slide under it with your spark plug wrench and reach
through the suspension A-arm. It's much easier than removing the intake elbow to reach the
plugs from above.
You need the Crane Hi-6 (ignition amplifier) with Crane (or other
aftermarket) coils. Mostly because the coils are going to have a vastly
different resistance than the stock coil. You have to wire the coils in series
or parallel [most people wire in parallel], and the resistance is just
way different, the stock setup is only optimized at the stock coil resistance. I
am running a Crane Hi-6 with 2 Crane LX91 coils (low profile coils). They work
great.
I have had 2 Crane dual post units die on me. My suggestion is to stay away
from them. My end solution was to wire 2 Crane LX91's in parallel and mount them
to a flat piece of metal which is attached where my battery used to be.
Scot
Here’s what I did:
1. Wired turbo control door open and removed actuator rod from door mechanism.
2. Removed lines/plugged lines to charge control.
3. Removed charge relief and capped hole and vacuum line (I have since put it back on,
but didn’t hook it back to the vacuum line.
4. Wastegate: Left the direct pressure line (with restrictor) in place.
Removed/capped the line that went to the solenoid.
5. Pre-control: History.
6. Installed down-pipe.
I’m waiting for my A/F gauge to come in, and I’ll be running to Home Depot
for the parts necessary to turn down the boost a bit, per Broooks’ web site.
David Liberman
Both oil temp and pressure sensors are mounted on the banjo bolt below the
oil filter. Mazdatrix sells a tapped banjo bolt adapter for oil temp and
pressure. I added a short pipe, a "T" and then threaded the 2 sensors
into the "T". (Home depot plumbing brass fixtures are used!) I used
the electric digital gauges. No problem and the digital oil pressure gauge is a
godsend-makes the stock one look like crap. Much more sensitive.
Marc Wiese
This is illegal for street use. It is very difficult to do with on the 3rd
gen's pre-cat and main cat. If you must do this remove the pre-cat and cut it
open with a metal cutter (air powered circular cutter), remove the guts and weld
it up. You will still get better
performance with a down-pipe because a down-pipe is much less restrictive at the turbo end
of the pipe.
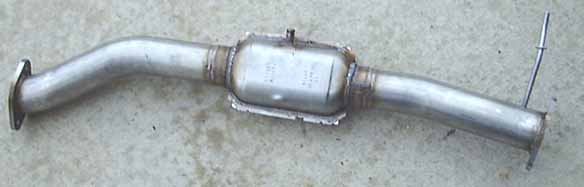
N-Tech hi-flow main catalytic converter (no need to punch it
out)
On the advice of Eric at XS Engineering I am installing an SX Fuel Pressure Regulator
on my 3rd Gen. I recently had my ECU reprogrammed by XS but am still not
showing a proper fuel mixture on my Cyberdyne A/F gauge with the heated Escort O2 sensor
installed. Eric tells me I should be seeing full rich but I’m only showing the upper
two yellows. He told me that they have seen a lot of the stock pressure regulators fail
completely or just not work properly resulting in a lean fuel mixture under boost.
I’ve seen a few pictures on the web and in Turbo that show 3rd Gens
with the same setup that Eric recommended to me and wondered if anybody wanted to share
some information with me on the installation process. The procedure I got from Eric was
something like this. An "a" denotes my deviation from Eric’s
recommendations.
1. Pull the factory regulator
2. Tap the factory fuel rail for ¼ NPT (Requires a ¼ NPT pipe tap $7.00 from
OSH)
3. Insert a ¼ NPT to -6AN 90 degree Male to Male elbow (Summit P/N AER-FCM2034 $7.95)
in the hole you just tapped.
4. Run a female -6AN line from the elbow to the pressure regulator. (-6AN line Summit
P/N AER-FCA0606 $24.95 (2) Straight -6AN fitting P/N EAR-300106 4.20ea)
4a. Add a 1/8 NPT Pressure gauge adapter (P/N EAR-100192 $6.99) a -6AN Female Flare
Swivel (P/N AER-FCM2915 $8.25) and the fuel pressure gauge of your choice. Put the swivel
on the pressure regulator attach the gauge adapter and attach the hose from the fuel rail
to the gauge adapter.
5. Run a -6AN hose (-6AN line Summit P/N AER-FCA0606 $24.95 (2) Straight -6AN fitting
P/N EAR-300106 4.20ea) from the fuel line coming from the tank, this is where it gets
confusing, to the pressure regulator (XS Engineering P/N SX Adjustable Fuel Pressure
Regulator $140.00). I don’t know what size the line is from the tank or what it takes
to adapt it properly.
5a. Between the incoming fuel line and the pressure regulator insert a System One fuel
filter with -6AN ends (Summit P/N SOF-202406 $91.95) This filter has a washable stainless
steel element that you won’t ever need to replace.
Question 1. What size is the line coming from the tank and what do you need to adapt it
to -6AN?
Question 2. How & where do you mount the pressure regulator?
I have no affiliation with XS Engineering or Summit Racing. I have provided part
numbers for convenience only. Check the part numbers before you go and order a bunch of
stuff and find out I screwed them up.
I hope this helps someone out and I would really appreciate it if someone answered my
questions. I know I can figure it out I just like to have everything ready before I go
tearing my car apart. :-)
Spencer Hutchings
According to the official Mazda test procedure, boost should be as follows:
Drive to third gear with normal acceleration
Accelerate from 35 MPH at WOT until passing 4500 rpm
A slight and smooth increase in power should be felt at approximately 4500 rpm. This
will be about 65 MPH.
Boost should be above 10 psi up to 4500 rpm. The boost will drop to about 8 psi
just
after 4500 rpm, and will begin rising towards maximum boost depending on the length of
time the throttle is held wide open. As a benchmark, many owners were asked to time their
cars from 40 to 70 MPH in 3rd gear. To try the test yourself, simply cruise at
35 MPH in 3rd, floor it and start timing when you pass 40. On average, a stock
car should do it in about 4.9 seconds and a slightly modified car can bring it down to the
4.2 second range.
Start in third gear at about 35 mph, floor it, start the stopwatch at 40 and stop it at
70. Do it on level ground and time going both ways if possible and average the runs.
The housing is just under the coolant metal cap, just behind the air pump. You must
remove the pump to get the housing out. The thermostat has a rubber gasket (requires no
sealant). > About $8 (Mazda OEM)
1. Remove the Air pump (must take off the belt)
2. Remove the housing...three bolts (If I remember correctly)
3. Clean housing
4. Fit gasket around thermostat and fit into housing
5. Evenly bolt up housing
6. Put pump and belt back. DO NOT over tighten belt (damage water pump)
Whole operation takes about 2 hours as you will likely have problems finding the bolts
and removing the air pump. I recommend only OEM parts on this...
|