How to Replace the Fuel Filter
By Rob Robinette
This is one of those things you may want to leave to a dealer
because it's such a pain in the butt to do. Mazda unbelievably hid the fuel filter between
the car body and the differential! The trick to replacing the fuel filter is that you have
to remove it from its bracket first so you can lower it a little and get a pair of pliers
on the hose clamps. Also Mazda uses a lot of hose/filter pipe overlap so it is very
difficult to get the hoses on and off.
Start by releasing the fuel pressure, see the Release Fuel Pressure how-to. It's important to open the gas cap and leave it open to keep
pressure from building in the fuel tank and pushing out lots of fuel. The less fuel you
have in the tank the better. If you only have a gallon or two and you open the fuel cap
very little fuel will leak out. I used 5/16 inch vacuum caps to cover the fuel filter
pipes and two Bic pen caps to plug the 5/16 inch fuel lines to minimize fuel leakage. Put
a towel over you to soak up any gas that may drip on you. If you need to replace any fuel
line be sure to use 5/16 inch fuel injection hose-don't use a plain fuel line that isn't
rated for a high pressure fuel injection system.
Jack the car and secure it on jack stands and put wheel chocks on a
front tire-the hand brake doesn't affect the front wheels so chock them for safety. Slide
under the car and remove the two floor pans on either side of the differential, one is
black plastic and one is aluminum. They are secured with about five 10mm bolts. The
Workshop
Manual shows only the passenger side pan removed but it will be much easier to see
what you are doing if you pull both of them.

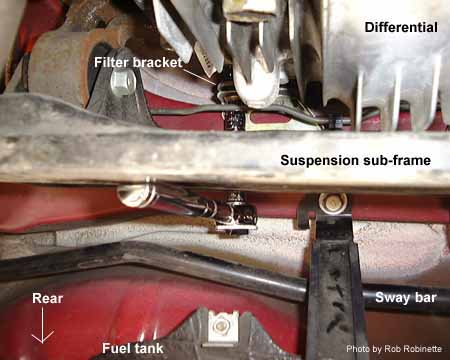
Removing the fuel filter-note the
ratchet wrench on one of the filter bracket bolts
Use a ratchet (or better yet an air-ratchet) with a 3 inch extension
and a 10mm socket (see photo above). Go up between the gas tank and suspension sub-frame,
slide the socket and extension over the sub-frame and remove the two 10mm filter bracket
bolts. The filter will come down a couple of inches which will allow you to reach around
the differential, one arm on one side, one on the other side and remove the hose clamps
and hoses. Be ready for the fuel spill from both the filter and the fuel lines.

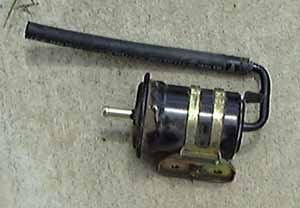
The infamous fuel filter-normally
you wouldn't remove the fuel line with the filter
Putting the new filter on is even more fun than taking
the old one off. Put the hoses and clamps on the new filter (tougher than it sounds). If
you have a helper you can have them hold the filter in place while you use the extension
and socket to turn the filter bracket bolts. It's difficult to do alone but they say it
can be done. You need to re-pressurize the fuel system to check for leaks and prevent the
starter from having to grind away for too long. See the Release Fuel Pressure how-to. While you have the F/P and GND terminals connected take a good look
at the filter connections to verify it's not leaking. Have a beer in celebration.
Rob Robinette
|