Turbo System Simplification
By Wade Lanham
I made this change because I wanted to keep the sequential system for now, but I wanted the car to be easier to work on and look cleaner
under the hood. I envy the non-sequential look. :) "Thanks" to Mark Valskis and Derek Vanditmars for answering questions, and Mike Putnam for putting together the "turbo control systems
ONLY" colored diagram.

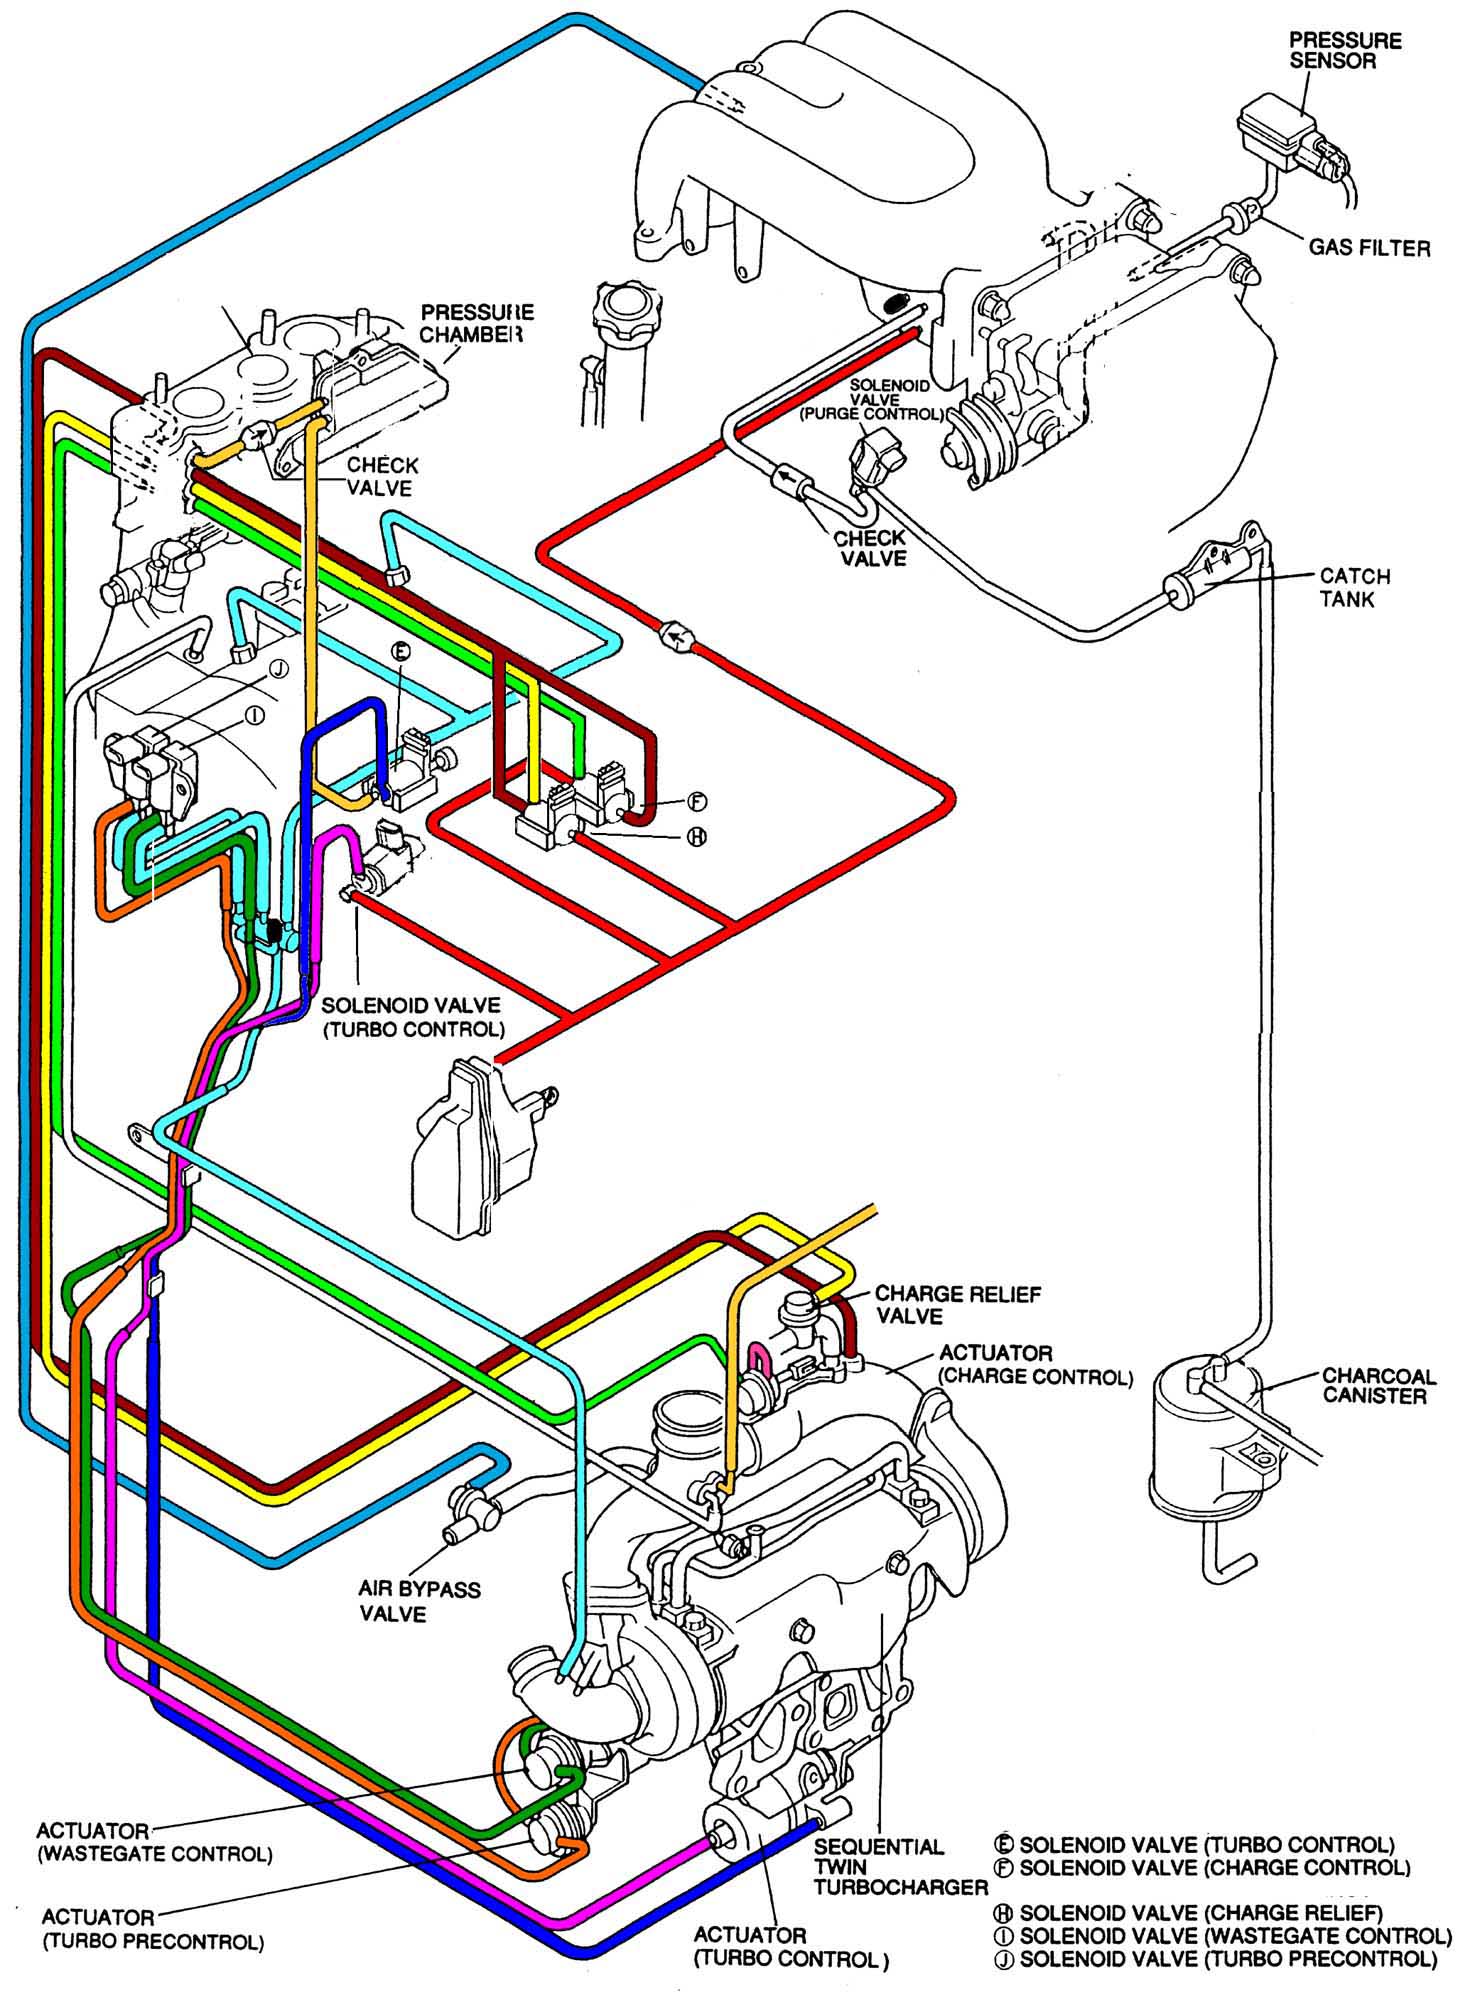
Click to view Mike Putnam's "Turbo Control System
Only" diagram
The ways I succeeded
1. The system is very simple now - there are few enough hoses and solenoids that I know where they should
connect and what they do.
2. The engine looks marginally cleaner fully assembled, and much cleaner with the upper manifold removed (where the lack of
solenoids/hoses really shows).
3. Almost every hose is easy to see and reach without removing ANY parts. I placed the solenoids and most hoses just behind the
alternator but in front of the upper manifold. If a hose does pop off, it shouldn't be hard to fix.
4. I have a box that weights about 15 lbs that has nothing but stock "junk" hoses, tubes, valves, etc.
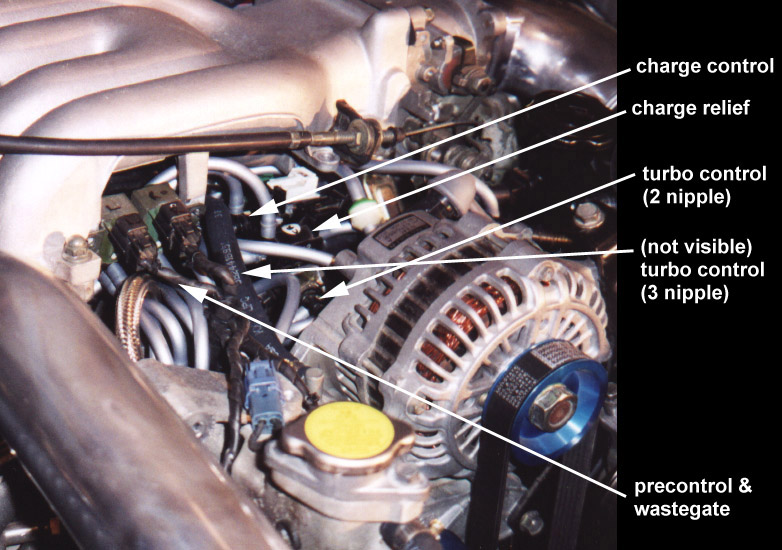
Photo by Wade Lanham
The ways I failed
1. The engine looks only marginally cleaner when fully assembled.
2. There are still approximately 25 vacuum hoses.
3. My car runs poorly when cold (I think this is because of the fast idle cam removal - I'll know for certain soon).
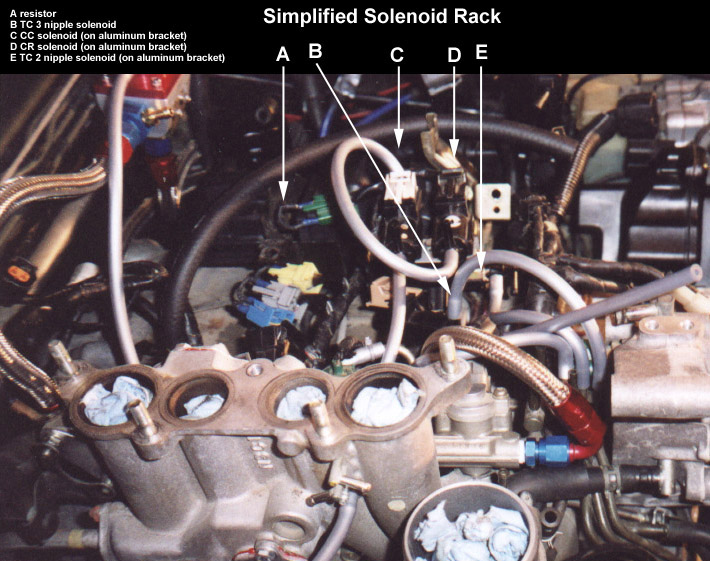
Photo by Wade Lanham
Notes
1. In the diagram, I show nothing for the fuel pressure regulator. I did some fuel system work at the same time as the vacuum system
which included an aftermarket fuel pressure regulator that I attached to the nipple on the bottom of the lower intake manifold (same
source location as stock but with only one hose.) You MUST leave the stock system intact OR add an
aftermarket pressure regulator of some kind. For those not modifying their fuel system at this time, be SURE to have the FPR solenoid and lines attached well and
correctly (failure of any of these parts could easily cause engine failure).
2. I left the colors the same as Mike Putnam's (?) colored flow diagram and system diagram. His diagrams were essential for me to make
these changes to my system successfully. I recommend printing both of his diagrams and mine if you plan to perform this modification.
3. For the Charge Control Solenoid and Charge Relief Solenoid lines that T, and the oil metering vacuum line T, I used some plastic Ts
from the local auto parts store. For the Vacuum Chamber connections I used 5-way that has a nipple on each end and three nipples
coming off the side. I removed all other metal tubes and Ts except for the tubes running down to the intake elbow and the turbo
actuators (it is left in the diagram) because it seemed like removing these would make the area cluttered with silicon hose instead.
4. I removed all the metal hoses for fuel/coolant. All the coolant lines were replaced with one that runs from the back of the block to the
filler neck in a straight shot. All the fuel lines were removed because I tapped the injector rails and used braided stainless. Most people
will probably be leaving all of these fuel and coolant lines stock.
5. I removed all of the solenoid "Rack." The rack was replaced with a small piece of aluminum that now holds the CC, CR, and the TC
actuator (that is normally on the ACV). The new AL rack is attached to the upper tab on the coil box. There are two of these - I think
they might have been attached to the original rack (?). The Pressure chamber is mounted upside down where the ACV used to be. You
could put it wherever you want. The other TC black solenoid rack valve is located in between the new rack and the lower intake manifold
in approximately the same position as in the diagram.
6. I removed the ACV, EGR, DT, AWS, and Fast Idle cam. I probably should have left the fast idle cam, because my car now runs like
crap when it is cold. These parts were replaced with blockoff plates and any solenoids that would cause error codes were replaced with
the appropriate resistors attached to connectors that would slide into the original harness (I didn't really want to cut the stock harness up
at this point). Pictures of these will be posted later. You can get the resistance of the solenoids from the workshop manual. If anything,
go a little on the high side.
7. I left the uncolored hose (in my diagram) on my car. I meant to remove it, but forgot until it was inconvenient.
8. I left the fuel evaporative system intact at this time, sans some of the unnecessary plumbling.
9. I rewrapped a lot of the main harness because the shrink wrap shattered when I moved the harness around.
10. I removed the nipple for the PVC from the manifold (capped the filler neck nipple), and the double throttle plates and related hardware. I
tapped both manifold holes and plugged them.
11. The orange line that seems to go to nowhere goes to the upper intake manifold (it should be obvious, just thought I'd mention it before
someone asked).
12. I used one of the nipples on the back of the intake manifold for my boost gauge.
13. Never, ever use cheap auto store emissions caps when you have extra nipples (I had two). One of mine blew out after a couple of days.
Get some good silicone ones, connect them in pairs with a piece of silicon tubing, or cut the nipple off and tap the aluminum and use a
metal plug.
I think that's it for now. As I think of more, I'll make adjustments to the diagram and this document. If you have any suggestions or question,
just leave me a message.
|