By Rob Robinette
The double throttle prevents you from using too much throttle before the car has
completely warmed up and can help prevent surging as you open the throttle. But
it can also cause boost problems if it fails to fully open once the car
has warmed up and it also constricts the intake tract.
Many of us have disabled or completely removed it to clean up the intake
tract (remove some restriction in the extension manifold). My car drove the same
with it disabled as it did with it enabled so I decided to completely remove the
butterflies. With the butterflies completely out my high RPM boost creep was
higher than ever, so it did seem to increase airflow.
Disabling the Double Throttle
You can disable it by simply plugging the vacuum tube that feeds into the
double throttle actuator on the extension manifold's firewall side. An easy
temporary fix is to put a clamp style paper clip on the vacuum hose and see how
you like it. You can of course remove the vacuum line that feeds the actuator. Be sure to plug the hose
nipple on the extension manifold. Remember to take take it easy on the throttle until
the car is fully warmed up.

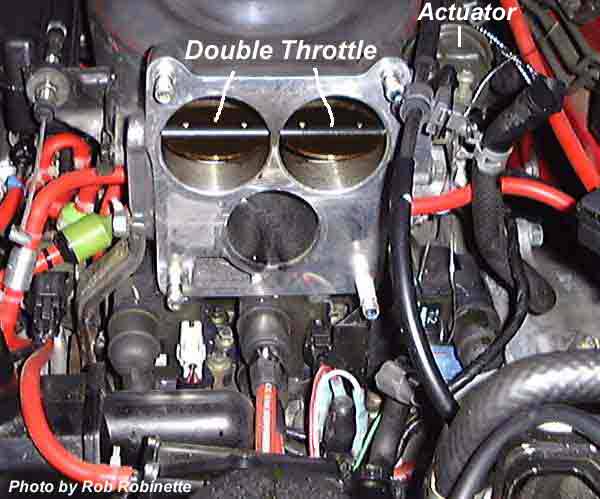
Double throttle butterflies (copper colored), and actuator
(top right)
Removing the Double Throttle
I liked the way the car drove with the double throttle disabled so I decided
to follow the lead of some other RX-7 enthusiasts and remove the double throttle
butterflies.
You have to remove the intake elbow and throttle body. See the Extension
Manifold Removal How To for help removing the throttle body.
Note: Mazda changed to a
metal gasket between the throttle body and the extension manifold. My original,
paper gasket ripped when I removed the throttle body.
It is possible to remove the double throttle while leaving the extension
manifold bolted to the engine, but it's difficult and you will have to cut the
double throttle shaft that the butterflies are screwed to in order to get it
out. If you want the option of reinstalling the double throttle you'll have to
pull the extension manifold off. This is also a good time to remove
the coolant flow to the throttle body and change
the plug wires.

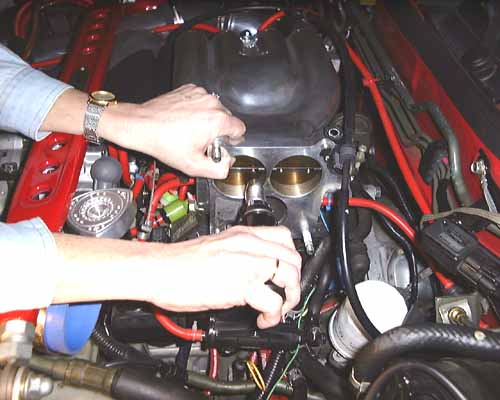
Removing the screws with an impact screwdriver (not my hands)
Once you have the throttle body off, use an impact type screwdriver to
remove the 4 screws holding the butterflies in place. The rear of the screws
have been flattened to lock them in place (you don't want a screw coming loose
and going into the engine).
Note: Ryan Schlagheck had to
drill his screws out, see his write-up at the end of this how-to.
I had my wife hold the butterflies closed while I
beat the hell out of the screws. This will take time because the impact will
have to be used until the screws are almost all the way out. Be careful and
don't strip the screws. When the screws are out the butterflies slide out of the
shaft. Remove the 10mm bolt on the firewall side of the extension manifold that
holds the double throttle actuator and butterfly rod. You can then slide out the
butterfly shaft. If the manifold is still on the engine you'll have to pull the
shaft out as far as it will go, then cut the shaft close to the manifold using a
hacksaw or a Dremmel tool with a cutting disk. After you cut the shaft remove
the rest of it.

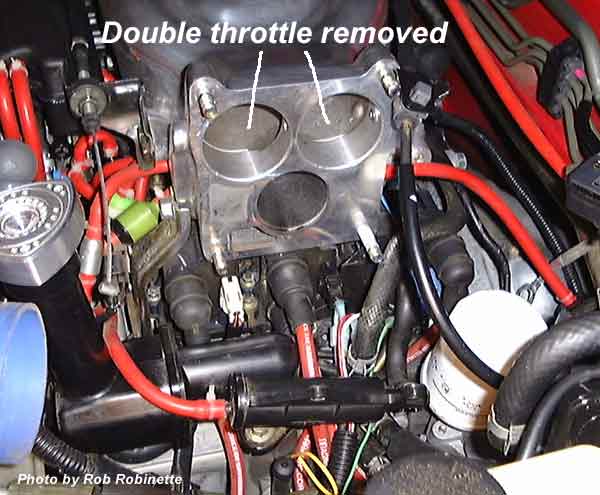
Butterflies removed, note the small bolt sealing the shaft
hole
I sealed the shaft hole by filling it from the inside with silicone sealant.
I then put some more silicone on a small 5/16" bolt and washer and inserted
them into the hole from the inside. I put some Locktite on the end of the bolt,
slipped on another washer and then the nut on the firewall side of the hole and
tightened it up. I cleaned up the excess silicone on the inside and added some
more Locktite to the outside end of the bolt after I tightened it (you don't
want this bolt to come loose). To minimize airflow blockage and turbulence I
ground off most of the bolt's head before I installed it.
Make sure there's no debris in the extension manifold and bolt the throttle
body and intake back up and enjoy your cleaner flowing intake.
Rob Robinette
One thing I noticed about the removal of my secondary butterfly plates was
that the screws that you chose to remove with an impact screwdriver were
mushroomed on the other side on my intake plenum, thereby making backing out of
the screws impossible. Your model may vary but people pondering this mod should
be aware that they may have to drill through the plates at the screws if the
head is mushroomed. I speculate that the screws are mushroomed to prevent the
constant heating and cooling action from slowly backing out the screws and
falling into the intake tract. My vehicle is a '94 Touring, so the '93's may
have had a different secondary plate setup.
I chose a drill bit slightly larger than the shaft of the screw (the head is
larger so you'll end up drilling that out like you would a sheared bolt) and
then I slid the plates out from the center of the rod, pulled out the rod and
replaced the hole in the plenum with an aluminum hex bolt (basically the same as
you did).
I also recommend that you remove the intake plenum altogether, to prevent
bits and pieces of metal filings from falling into the lower intake plenum.
|


