Home ] Up ]

How to Install a Water Temp Gauge

By Rob Robinette
Why do you need to add a water temp gauge when the 3rd gen RX-7 comes with one?
Because the stock gauge won't show a rise in water temp until it's very, very hot and too late.
Mike Putnam wrote:
While working on the temperature gauge linearization I came to the realization that the H mark on the standard third gen temperature gauge indicates 266 deg F. The coolant recall replaced the original 1.3 Bar radiator cap with a 0.9 Bar cap. A 50% antifreeze mixture at 0.9 bar pressure boils at approximately 261 deg F. So the H mark on your standard stock temperature gauge really tells you at what point you have converted your gasoline engine into a steam engine. One more reason to modify your temperature gauge.

The first thing to decide is what type of gauge to install. I went with the Cyberdyne digital gauge because it's electric. It is much easier to run a single wire through the firewall than trying to get a mechanical gauge's probe and probe cable through. The Cyberdyne gauge also has a small, easy to install 1/8th inch NPT (National Pipe Thread) temperature probe and +- 2 degree accuracy. I purchased it from http://www.jegs.com. You'll need the gauge ($30) and a wire kit (temp probe & wire $10). Both are available from Jeg's and http://www.summitracing.com. You'll also need a 1/8th inch NPT tap to tap the temperature probe hole. 
More info on installing gauges can be found in the gauge installation how-to.
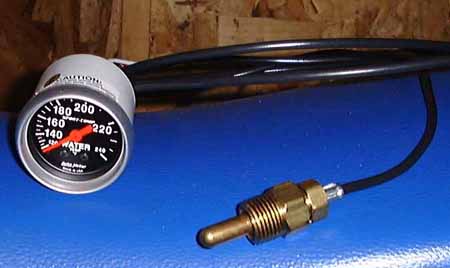
AutoMeter mechanical analog water temp gauge and huge temp probe and cable (the cable and probe do not detach from the gauge for installation!)

If you don't want to drill into your thermostat housing to install the temperature probe, you can install the probe into the throttle body coolant lines by splicing in a 1/8th inch NPT "T". Any hardware store that carries plumbing supplies will have the NPT "T" (Home Depot & Lowe's too). Just take your probe or gauge into the store and find the "T" that fits. The Cyberdyne probe will go into one hole, and insert two 3/8" hose adapters into the two other holes. You'll need to ground the "T" so the electric probe will work. A mechanical probe doesn't need to be grounded. The AutoMeter mechanical temp probe is so big you would need a much bigger "T". Remember to use Teflon tape or pipe thread compound to seal the threads on NPT fittings, but make sure at least some of the temperature probe's threads contact bare metal for proper electrical grounding.
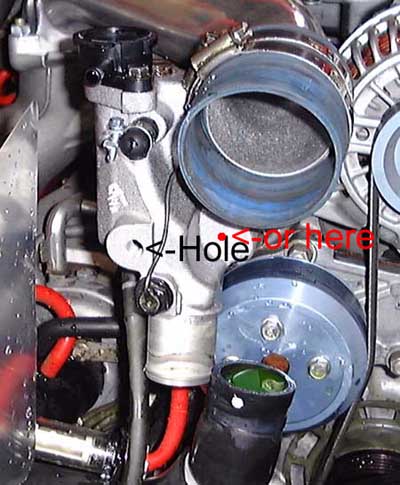
Hole for the temp probe (my radiator cap neck is a 2nd gen part used to eliminate the AST) Chuck Westbrook Adds: A better place to put the sending unit is to the right, behind the letters "OL" in HOLE (red dot). That places it directly in front of the thermostat and more out of the way.

To tap into the thermostat housing you'll need to remove the intercooler. 

Remove the large coolant hose's (runs from the bottom of the thermostat housing to the radiator) upper connection. You'll lose about 1 quart of coolant. This will keep the drill and tap debris out of the cooling system. Put some rags or paper towels below the hole and over the open hose to catch the aluminum bits during the drilling. Try not to ram the drill bit too far into the thermostat housing when you break through. Next lubricate and tap the hole. Periodically test the fit of the temp probe. You want the probe to go almost all the way into the hole when tight. Flush out the thermostat housing with water when finished tapping and before inserting the probe for the last time.
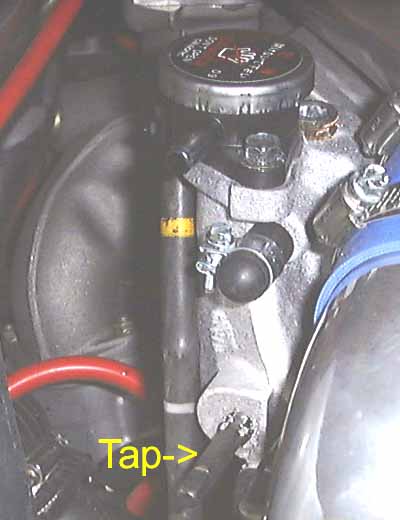
Using 1/8th inch NPT tap

I covered half the probe's threads with Teflon tape to help it seal. An electric probe must have some metal-to-metal contact for electrical ground. Don't over-tighten the probe. It's pretty easy to strip aluminum.
Run the probe's wire through the firewall to your gauge. You can use the same route as the battery cable (battery relocated to the bin). I used the hole I drilled when I installed my shift light (see photo below).
The Cyberdyne gauge needs switched power, a ground and the probe connection to function. The probe is a thermistor (variable resistor) that changes it's resistance with heat (more heat less resistance). The gauge is really just an Ohm meter calibrated to degrees. Good luck.
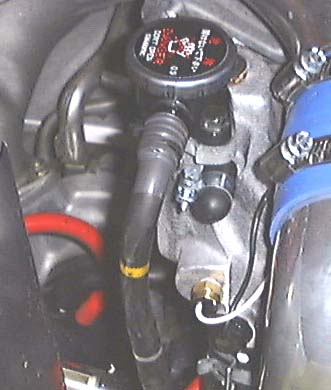
Temperature probe installed

You can compare the accuracy of your gauge to the ECU's water temp sensor by checking when the cooling fans come on. Let the car idle until the fan comes on. The ECU turns the fans on (low speed) at 220 degrees F. It should go to high speed at 226.
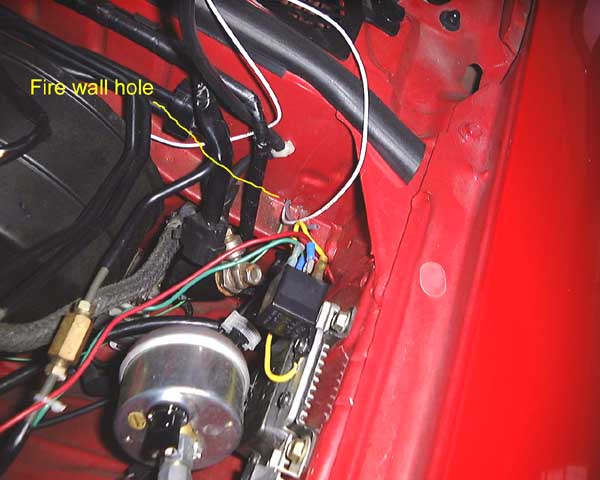
Where I went through the fire wall
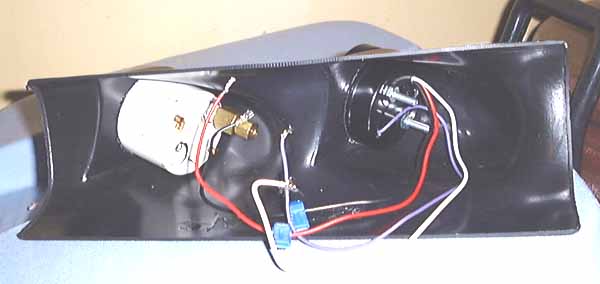
Back side of the AutoMeter A-pillar dual gauge pod
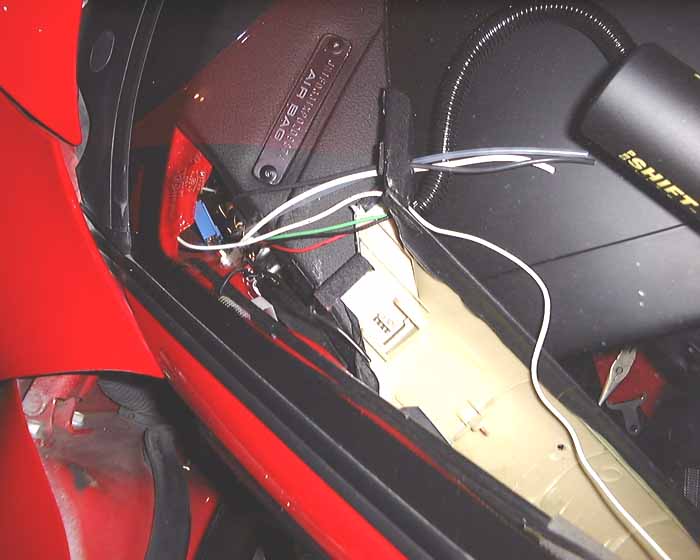
With A-pillar trim removed, hole in dash is exposed to run wiring
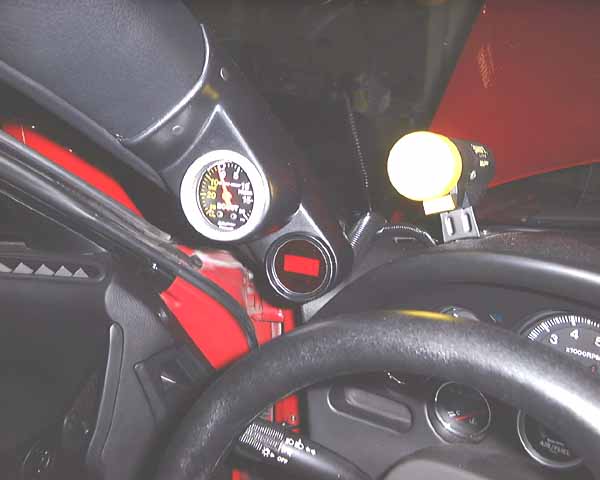
The installed pod, boost gauge and Cyberdyne digital water temp gauge
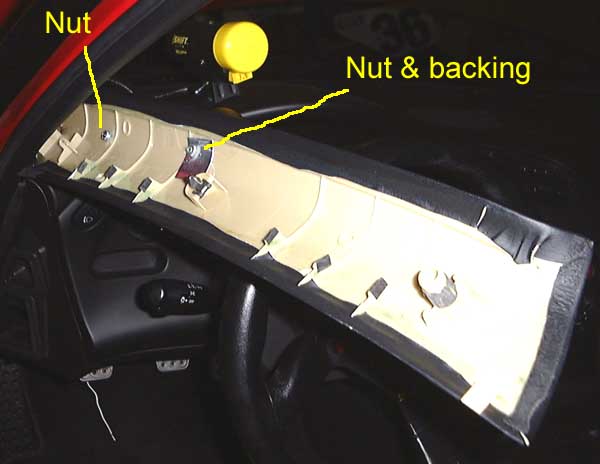
If you don't use a pod you can mount individual gauge cups to the A-pillar, notice the aluminum sheet used to reinforce the plastic A-pillar (used for large 2 5/8 inch gauge). Other gauge mounting options can be found at the gauge installation how-to.


What Temperatures to Look For

From page T-24, Mazda Service Highlights:
Normal operating temperature is 158 - 221 deg F
My Cyberdyne digital showed 231 degrees when the low speed fan came on (ECU turns it on at 220) and went to 240 degrees during idle before the fans cooled it down. It ran at a constant 175 degrees just tooling around (55 degrees F outside) and rose to a high of 194 during spirited street driving.

Rob Robinette


The cooling fans are going to come on at 220 - 230 but this is based on the stock temp sensor. Not only do you not know the accuracy of the stock sensor but there is no easy way to tell how the ECU decides to trigger the fans. Highway cruising in 70-80F temp and stock radiator you will run 175-185. Basically you see the thermostat cycling open/closed. On track temp is directly related to how much you wind it out at 6500+ rpm. A clean stock radiator which is fully sealed and ducted (with a/c condenser in place) should run 210-230 on track in 80F temps. After 230-235 you are temping fate because when temp goes up it goes up really fast. I start short shifting when temps exceed 235. Also, oil temps are going to be about 20F higher than water (min) and oil is used to cool the rotors (sprayed on the inside of them from the eccentric shaft). Shifting at 7K and up-shifting to 4th instead of holding it in 3rd for long curves at 7K eliminates the problem.
Sandy Linthicum

My track oil and water temps were always the same. This is the first time I have ever experienced this since installing the oil cooler ducts for my aftermarket oil coolers. Before, oil was always 20-30 degrees hotter than water. I try not to draw too many conclusions from the data, as it would probably be wrong, BUT the pure fact remains that the ducts did drop oil temps to engine coolant temp levels.
On Saturday, the ambient temps were in the mid 60's. There was a good northern wind blowing and it was chilly. During morning runs on the track, my water and oil temps were between 210-215 when under wide-open-throttle and 210-225 in the afternoon. Immediately during cool down, my temps dropped back to 195-200. Again, oil and water were the same. On Sunday, the ambient temps were in the mid to high 70's. Morning runs saw 210-220, while afternoon runs saw 225-235. Once more, cool down laps brought water and oil immediately back to 195-200.
I was running with fans on (have done the fan mod) and was turning laps faster than 95% of the participants. I also have the GReddy Front Mount IC setup with most of the holes blocked with foam or tape. As a comparison, Brad Barber's setup was showing temps about 10-15 degrees cooler than me. That is enough proof to me that the front mount setup is not as efficient in cooling as the more stock setup. I am convinced that for track cars, you need the radiator up front behind the condensor. For drag racing, then the front-mount seems to be the best.
Jon Drake

My normal water temp get about to 205-210 F steady when running on hot days, speed~70 mph, 5th gear. When underway it never gets much higher than that. (proves only that the 210 thermostat is open!) Oil gets about 180-190. Higher speeds lower the oil temp! However upon shutdown the temp can easily rise to 250 or higher, and I can see why the fans come on as they do. Do the fan mod. I would think that when underway you do not want any temps higher than 220 or so! bigger radiator would be called for.
Marc Wiese

You'd wanna keep it somewhere around 180-200, but above 220-230 can cause trouble. I have a digital water and oil temp gauge at the same locations. It is a 93 R1 upgraded with "Mazda Comp" radiator.
I am not sure about hot days but on a cool day (tonight 58 deg F) at a steady speed (read no turbos) of ~70 MPH, the water temp reads 165-170 deg F. This appears to be the lowest temp that the engine will reach once fully warmed up. It is probably dependant mostly on the radiator. The oil temps read ~30-40 deg F lower than the water temp at speed. This is because the oil temp is measured after the oil coolers. The oil temp will quickly reach water temp on standing still. On the street, I tried to keep the water temp below 200 deg F by turning on AC/fans. I can't comment on the effects of warmer ambient temperatures or track driving.
Ed Kim

My oil temps now run -3 to 10 degrees different (yes, that's right, sometimes 3 degrees COOLER than my water) from my water temps, EXCEPT when standing still. Then oil temps begin to rise to about 20 degrees over water temps. Once I begin moving, I can see the oil temp gauge move rather dramatically downward. Today with ambient temps from 70-80 degrees, my water and oil always stayed pegged at 199-201 degrees while driving on the freeway. Both oil temp and pressure sensors are mounted on the banjo bolt below the oil filter. Mazdatrix sells a tapped banjo bolt adapter for oil temp and pressure. I added a short pipe, a "T" and then threaded the 2 sensors into the "T". (Home depot plumbing brass fixtures are used!) I used the electric digital gauges. No problem and the digital oil pressure gauge is a godsend-makes the stock one look like crap. Much more sensitive.
Marc Wiese, 76 RG
 

Home ] Up ] Remove Manifold ] Vacuum Hoses ] Turbo System Simplification ] Boost controller ] PRofec Install ] AVC-R Install ] ECU Modification ] PMS Switch ] Disable  Double Throttle ] Remove Throttle Body Coolant ] Coolant Tank Elim ] [ Water Temp Gauge ] Fuel Filter Replace ] Fuel Filter Move ] Release Fuel Pressure ] Fuel Pressure Gauge ] Adjust TPS ] Rebuild Turbo ] Sparkplug Wires ] Flush Radiator ] Water Pump ] Racing Radiator ] Compression Test ] Efini Y Pipe Install ] IC Duct ] Secure Battery ] K&N Air Filters ] Replace Oxygen Sensor ] Remove Air Pump ] Replace EGR ] Disable EGR ] Remove PCV Valve ] Replace Turbo Coolant Lines ] Cold Air Intake ] Nitrous Install ] Other Engine How To's ]